Part 1 Part 2 Part 3 Part 4 Part 5 Part 6 Part 7 Part 8 Part 9 Part 10
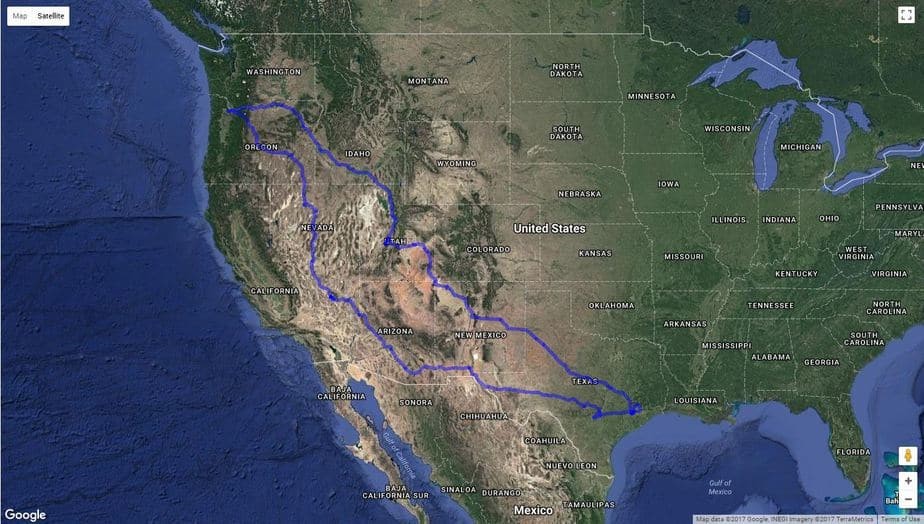
At the close of last year, I went on a 6,000-mile adventure. It was the result of some specific goals and some events that changed the face of my original plan. It turned into a journey to remember. My daughter encouraged me to write about my experience and the work began. What I had imagined would be a quick story has turned into something much more wonderful. So, here is the preface, the beginning of a wonderful adventure! I hope you enjoy it and come back for more. We’ll be posting every Thursday until the story is complete.
Subscribe to our newsletter to get the whole story delivered to your inbox!

Preface
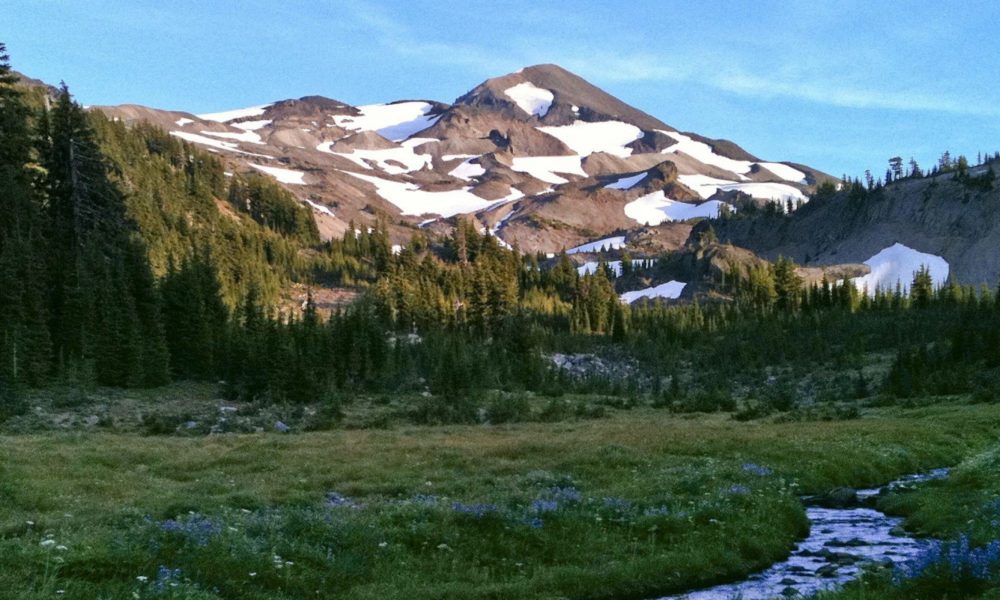
I woke each morning long before the sun, loading my vehicle and preparing myself for the days’ journey. Hurtling through the darkness as the sun climbs into view, illuminating the countryside I am so eager to see. Immersing myself in the beauty of this great land as the sun races to the next horizon, changing the sky like autumn leaves to brilliant red and orange.
A little background so you can hear my voice better. I am a simple man that values family and community. I believe the single most important thing we have is our liberty, and without it, we are lost. I am a father, husband, and friend. I have been in love with the natural world for a long time and the wilderness is where I feel the most powerful. I believe it is our responsibility to be as self-reliant as we can which is different for everyone. We do what we can with what we have. I am a competent carpenter, plumber, and an electrician. I am a fair mechanic and do most repairs myself. I love the arts and have drawn, sculpted and painted. I truly enjoy creating things and work with wood, metal, and plastics.
I have backpacked a great deal of the Pacific NW, through all of the seasons, including solo adventures. I am a certified rescue diver and have spent all of my time in the Pacific, some warm but mostly cold. I have extensive firearms training from both the military and civilian worlds and I am a constant student in search of all the information I can find. Knowledge is power.
I would spend the next 17 days in this van repeating this ritual, yearning to see what each day would bring. A total of seven days were spent in training classes, the original purpose of this journey. These days would begin and end the same as my travel days but would be filled with exercises and education between dawn and dusk. I am taking defensive handgun courses from two industry-leading sources. I believe it is of the greatest importance to keep my own training at the highest level I can so that when I train others they are getting the best possible instruction I can provide. The training was rewarding and beneficial, well suited for its purpose. I gained a lot from each day of class and felt accomplished afterward, but the road was always calling me. I longed for the hours of discovery traveling through the countryside on the backroads of America.
First Leg
I would spend many days preparing for my cross-country journey. After all, our motto is, “Stay Vigilant and Be Prepared.” I would be remiss if I allowed myself to fall victim to some unforeseen event that I wasn’t prepared to handle. So, I loaded my van with all the necessary supplies and equipment for my trip. We put new winter tires on the van in preparation for the many passes I would be traveling through. The snow chains were stored in the back just to be sure. I double-check that everything is working as it should be and have it serviced by a national outfit before leaving. This will make it easier to get warranty service if necessary. She gets new wipers as well, a small price to pay for a clear view.
My journey started on November 29th. It was a cold morning in the valley but would turn colder and bring snow as I moved through the pass south of Mt. Hood. It connects the Willamette Valley, where I have spent most of my life, to the grasslands of the Warm Springs Reservation. This is a beautiful state with great geographical diversity that affords recreational opportunities from alpine climbing to windsurfing and most things in between. I have never felt that I was missing out by spending my life here but I was always drawn to see the rest of this land. Some things are just best in person, a photo or video can only do so much. I want to taste the air beneath the waterfall and be awed by the vastness of the open plains. Feel the heat as it wafts up from the desert floor and hear the salt crunch as I walk across the flats. I have explored parts of Utah and Arizona but had never been to Texas or New Mexico, let alone driven all the way to Houston and back. The reality of the long road ahead of me was starting to sink in. I reminded myself that I must embrace the experience and greedily take everything I can from it.
The snow in the pass was brilliant white and covered the trees and ground beside the road. I was blessed that the road itself was mostly clear and there were no real issues for travel.

I knew it was going to be a fantastic voyage. As I dropped into the grasslands of the reservation in North central Oregon I reveled in the diversity and my eagerness to see what lay ahead of me grew. This part of Oregon is mostly rolling grasslands broken by the occasional rim rock canyon. Both large and small, they are cut by the many rivers that are fed by the Cascades, the Blues, and the Steens. These are the prominent mountain ranges in central and southern Oregon. Eastern Oregon holds more mountain ranges, but I won’t see them for another fifteen days. I pass through this region by skirting the populated areas, enjoying the scenery of the road less traveled, sticking to state highways and exploring the many rural communities.
It seems to me that most all of us are looking for the same thing, a place to call home, the love and respect of our friends and family, and a way to provide for ourselves. I can see the decaying effect our failing economy is having on these rural communities. It’s disheartening and obvious that they are paying the highest price for the unchecked greed of the few. The wondrous thing is you wouldn’t know it from talking to the people. Hope is still alive and they go about their business believing in the future, confident that they will prevail.
 My last stop in Oregon is a small travelers depot in Crane. It has gasoline, sundries, and a small grill serving standard American fare. It is a quaint building that reminds me of the old westerns I and my friends watched growing up. The people are friendly and welcoming and oddly enough, Boston was playing on the jukebox, one of my favorite bands. The woman at the register apologizes for the music, to which I respond, It’s not bothering me they are one of my favorites! She gazes at me for a moment in what appears to be disbelief and responds I hate them! This just solidifies the oddity of the event, I thank her and move along. The gentleman out front shows interest in the sign on my front door, “NW Survival LLC”. He asks, “What is that all about? You teaching people how to how to survive the zombie apocalypse?” He is only half serious, and we talk for a few minutes as the van fills with gas. This man is prepared. He is living mostly off-grid and has backup plans in place if the system fails like all survivalists expect them to. It is good to know that there are like-minded individuals out there. It is getting close to the end of the day and I still have miles to go to get to my room for the night in Winnemucca, NV.
As I was driving the last few miles towards Winnemucca, I started thinking about what I would like for dinner, traveling lends itself to eating out, good or bad. I decided I was really in the mood for chicken, KFC to be precise. I don’t quite know why but I really like their chicken and mashed potatoes with gravy. So I kept an eye out as I was following the GPS to my hotel, turns out there was a KFC in the same parking lot as my hotel, the stars have aligned! When I reached Winnemucca the sun had already set so my only reference to my surroundings were the street lights and storefronts. When I rose the next morning to prepare for the next leg I learned I was across the street from the towns’ cemetery  which held some of the earliest settlers to the area. It was a reminder of the strong, enduring, resilient folks that came to call this area home so many years ago. As I pulled away the sun lit the horizon with a brilliant splash of red and orange light silhouetting the hillside dotted with headstones. I thanked the town as I drove south into the Nevada desert headed for the town of Pahrump and my first four days of training.
My first stop of the day was Battle Mountain, NV just a quick stop for fuel and a cup of coffee. The landscape has changed now to a more arid desert although it is still quite cold, I am moving into the interior of Nevada. I love the desert, it is so open and larger than life. It lets your imagination set in, like giants doing cartwheels. I can breathe! One of my favorite little mountain communities, Austin, NV, is my next stop. It is a small quaint little town in the desert mountains on highway 50. It is very cold here and the town constable has someone stopped, presumably for violating the speed limit, which is 20. But Jim (I just made up the name) sits on the front porch of the thrift shop slash museum and offers me a cup of coffee as I pump my gas. Typical friendliness for this town.
Winding through switchbacks climbing out of the town over Austin, I summit at 7,490 feet on the east side of the Toiyabe mountain range. I drop into the Big Smoky valley which runs basically north-south between the Toiyabe and Toquima ranges for roughly 85 miles. It is so vast and beautiful and oddly smoky in appearance. It brings a sense of peace and freedom to me, and I do not see another soul for 100 miles.
 Tonopah pops up out of the desert just as you begin to feel like you won’t ever see civilization again. It breaks the trance of the desert and welcomes you. It is the heart of America that lives in these communities, where gentlemen still hold the door and yes Ma’am is heard frequently as they move through their lives, not in too much of a hurry to respect each other. Reminds me of a better time and shows me how the city hardens us and separates us in close proximity. This feels like a place I could stay for a while. I’m in the high desert now hovering around 5,000 ft. and moving south on 95. The Joshua trees are becoming more dominant in the desert. as I bounce from small town to small town. I wonder to myself, how do they survive out here? These towns are 100 miles from nowhere, how do they make a living? Filled with ornate stone buildings that must be nearing 100 years old or perhaps more. Remnants of a different time well preserved in the central Nevada desert.
Subscribe to our newsletter to get the whole story delivered to your inbox!
Pushing into the southern Nevada desert I pass over many summits as I slowly descend  into the Amargosa desert, Death Valley is not far from me now. It is finally beginning to warm and feel like what most of us think the desert should be. The vegetation hasn’t changed much but I welcome the warmth in the afternoons. I pass through Scotty’s Junction, a mere visage of what I assume it used to be. The colors of the hills here are intense, gone are the muted tones of the high desert, giving way to the deep reds and orange layered like a parfait.
Pahrump is a small town pressed up against the Spring Mountains, south of the Nellis Air Force Range, closer still to Death Valley. It is a relatively non-descript town newer than the smaller towns I’ve come through on my way here. But, it will be my home for the next five days. I rented a trailer from a local family as my command post for my class, but that is another story. The trailer is more than sufficient and I am welcomed with a fine selection  of coffee and teas for the Keurig. From here my commute will be twenty minutes each way. The stars at night in the desert are bountiful and bright, it reminds me of the nights in the wilderness away from all the light pollution of the cities, out where the air is clean and clear.
Most mornings here I was greeted by amazing sunrises and finished my days with spectacular sunsets. The starkness of the desert is offset by the richness of colors you are blessed with at the beginning and end of each day. It is all but impossible to impart the beauty through words. The skies rich blue background being washed with crimson reds, fiery oranges and brilliant yellows accented by ribbons of clouds that silhouette the desert foliage. The transitional times of the day are the best, when the desert feels most alive it stirs something in your spirit.
After four hard days of training, I arise at 4:30 am to pack and prepare for the next leg of my journey. The van is packed and I am off before the sun graces the sky. I am filled with a sense of accomplishment and an overwhelming appreciation of the freedom I have to be on this adventure. I am headed to Las Cruces, NM and looking forward to all the wonders of the road along the way.
Second Leg
I stumbled into this journey of exploration but I am fully embracing it. I was originally scheduled for my next class in Houston and was prepared to fly there. Airline tickets were purchased. Accommodations were set. Then the tragedy in Las Vegas, NV happened and I became concerned about my ability to travel as I planned, due to the tools and equipment I need for these classes. I started to look at driving and decided that if I was going to drive I should make it worth it and take the class I just finished here in Pahrump as well. Then it morphed even further into a journey of discovery and I altered routes to include more state and county roads than interstates. It has evolved from a five day trip to seventeen.
As I head southeast away from Pahrump on state route 160 in the darkness I am thankful  for my time there and simultaneously excited for the road ahead. I have not been to New Mexico or Texas let alone drive through them. I can only imagine what lies ahead of me. I have been traveling in the silence of the morning with only the whirr of the tires on the road to accompany me as I come up and over Mountain Springs summit. I am greeted by the sunrise over Las Vegas to the east in the distance and the full moon still up in the west behind me. I stopped to take some pictures and turned on the radio. I was surprised when “More Than a Feeling” by Boston came on, I took it as a sign that good things were coming my way. I have found the music to be, dare I say, in sync with my emotional state.
I pass through Las Vegas during rush hour and am reminded that this is what I left behind… A feeling of desperation strikes me, I can’t get away fast enough. I am spoiled now by the open space of the desert, I don’t want to go back to the crowds of the urban life. Where life moves so quickly it becomes hard to breathe, to feel your spirit. A stop at Boulder City to fill my tank and my coffee. It is a smaller town but still reeks of the city. I will enjoy my trip through Lake Mead recreational area, it is beautiful here as the rock gives way to the water. I move swiftly across the Hoover Dam and into Arizona. I’m on 93 south which will take me through Kingman, a small town in the Mojave Desert, pressed into the crease of the Hualapai Mountains that is formed by Interstate 40. I will spend a few short minutes on I-40 before I turn south again on 93.
Back into the desert. Actually, a valley between the Hualapai Mountains to the west and the Aquarius Mountains to the east. The desert is littered with Saguaro now and it is alive, the cacti are blooming. It is a good time to be in the desert, the road is quiet, I have  chosen my path well. I am surrounded by Joshua trees now, it is odd to call them trees as I am from the NW. They are nothing like the trees there. There is a sense of magic as the Joshua trees fill the desert, looking like some strange twisted visage of a man. I am close to Phoenix now and the road is getting busy, first through Surprise and onto the 10.
I am stopping in Tempe for lunch with my Brother in law Chris and a quick visit with my sister Sara. The traffic is crazy, I do not miss it at all. I end up late to my destination and miss seeing my sister, it is sometimes painful how life gets in the way of our plans. Too busy to breathe and live, forced to move from one appointment to the next with little time to process the experience. Racing through our lives in a hurry to get to someplace else. It saddens me when I think on it. My lunch with my brother in law is worth the traffic, he is a fine man, strong and kind, dedicated, hardworking and intelligent, the kind you can see. We get lost in conversation and I overrun my timeline, but it is good to be reminded that family is important and needs to be cherished and tended to, just like your garden. I am filled with thoughts of those I didn’t see and gratitude for those I did as I drop back onto the 10 and head southwest towards New Mexico.
I will be on Interstate 10 for the rest of the way to Las Cruces. This is not my preferred path, but is necessary to keep my timeline. I have to make up for some time I spent in Tempe. I will take the path I planned on the next adventure and until then I will make the most of it. Tucson comes and goes in a flash and I am drawn from my path by the promise of Tombstone. I take a slight detour, who am I kidding, it is over two hours round trip but worth it. Back on the 10, I pass through Fort Bowie National Historic Site just before entering New Mexico. There is so much open space out here it makes my mind wander. I think about why it is that the majority of our population chooses to be clustered so tightly in large paved metropolitan areas that have all but a vestige of nature squashed or sequestered to a designated area. There is a vastness out here and it makes me feel alive.
I arrive at Las Cruces in darkness after passing through the western New Mexico desert  and over the summit at the continental divide. The drive was peaceful and quiet, the landscape is changing again. I traveled through some very rocky areas that reminded me of the old westerns where the large flat top mountains dominate the horizon, and castles made from boulders seem to be cut from the earth by invisible water. Prickly pear cacti are plentiful now with the ever-present sagebrush and occasional juniper. Las Cruces is a city that is pushed up against the base of the Organ Mountains and held there by the Rio Grande. It is true what they say, water is life. For me it is time to rest, it has been a long day, I have seen a lot, and crossed the Rio Grande. Tomorrow, I will be going through western Texas to New Braunfels, the midpoint of my adventure

It is a cold morning here in Las Cruces, right around 21 degrees. I didn’t realize it got this cold so close to the Mexico border. Sounds like I am going to run into snow in Texas, so I think I will wait a bit for things to warm up. I’m finally on the road about 7:30 am and hoping for clear sailing. I hit a time zone just after leaving so it is now 6:46 as I cross into Texas. I have been traveling along the Rio Grande and looking southwest into Mexico, there is something odd about driving along and looking into another country, but I guess it is only because it is unusual for me.
The snow hit pretty hard for this area, I diverted around the north side of El Paso on the  375 loop because I-10 was all jammed up from accidents. It was nice to avoid the sprawl of the city a bit, but not completely. It is a much denser population than I am used to. I have noticed that when I take these alternate routes I do see a lot that I wouldn’t have if I stuck to the most common routes. I see more of the real world, like the manufacturing plants that employ a large percentage of the population, the small suburbs that were perhaps at one time considered the bedroom of whatever major city they are near, and the rural areas that I am endeared to.
Subscribe to our newsletter to get the whole story delivered to your inbox!
It disturbs me when I see all the closed businesses and empty streets of what was most obviously a once thriving community. I can only infer that they have been decimated by a failing economy devastated by massive unemployment. It makes me long for better times, simpler times, but those are gone and we need to find a path that will take us to a new more prosperous time. One where we are responsible for our waste and cognizant of the needs of the community and still able to build lasting progress. It is a pretty landscape here, but different. I am getting into the hill country of west Texas.
It has been raining and cold since I crossed into Texas, not at all what I was expecting. But it makes it feel clean and the land looks like it needs the moisture. The rocks are reddish brown darkened from the rain and the trees are green and aside from being smaller than I am used to, abundant. I am traveling on I-10 now just because there isn’t really a reasonable alternative. There is not much to remark about, other than a lot of wide open space dotted with an occasional group of mountains. There are long stretches of road here with near to nothing but desert.
I hit a Border Patrol checkpoint at Sierra Blanca, about 20 miles after I-10 turns east and pulls away from the Mexico border. They are serious here, but I have no issues getting a wave through, and I’m on my way again speeding through west Texas at 85 mph. It is not long, 90 minutes or so, before I hit the I-20 interchange and completely socked in with fog. I mean 20 mph might be too fast. It is eerie but cool at the same time, as long as I don’t get rear-ended by some maniac flying through here. I was hoping to see a little more wildlife but what can I expect when on the interstate. More cars, that is what I could expect. But strangely the road is all but absent of other traffic am I in the zombie apocalypse and just don’t know it because I have the radio off? Let’s find out.
Now that I have reached Fort Stockton the activity has picked up some. It is incredible to try and contemplate what life was like here 160+ years ago when it was first  inhabited by the settlers. Most of us have spent little time without running water or indoor plumbing. That was a normal life back then. Some say it was harder, I think it was better. Life was slower then, you had time to breathe. Maybe that is why I enjoy the wilderness so greatly, it is slower out there. It expects nothing from you other than what you need to survive, shelter, water, and food.
Texas is a huge state and I have just spent the better part of 5 hours driving through the least populated portion of the state. There is little here of any geographical distinction other than the sheer vastness of it, I think I drove an hour without seeing another vehicle. This kind of separation gives me plenty of time to contemplate the important things like; what does the future hold? Where do I want to be? Who do I want to be? How do I get there? Our society here in the west typically tells us that those are questions to answer early in our lives so we can plan and make the life we want. I challenge that assertion, I don’t think most of us, with some exceptions, know what we want. We are too busy to think on it, our lives do not provide the liberty necessary for great thought. Our minds are consumed by the triviality of western culture, we have lost our philosophical curiosity.
 Since I am headed to New Braunfels for the night and the Interstate bores me, I have taken to the backroads once again. After all, it is here that I feel most comfortable and my senses are sufficiently stimulated. I am in the hills now. Lots of ranches here, full of sheep and cattle with an occasional orchard of one sort or another. The roads are far more interesting with a surprising amount of continuous elevation change. Up and down like the waves of an ocean frozen in time. They must have flash floods here because the roads quite often have warning signs in the low spots. There are bridges that appear to go over dry creek beds which is not uncommon to see in Oregon during the summer, but this is winter, all the creeks in Oregon are running now. Strange to see a dry creek bed in the winter. It is more different than I thought and at the same time more familiar.
New Braunfels is a cute little town. It reminds me of Sisters, Oregon. Downtown is touristy with shops for artists’ wares, cafes, and restaurants of the trendy kind, and it is suited well for those on foot. The place I am staying is a bit outside of the heart of New Braunfels, so it is not affected by the tourists. It is a nice resort that can easily accommodate an extended family. Definitely more than I needed but it has laundry facilities in my unit and I do need to do some laundry after 8 days on the road. It is a place I will return to with family and friends, but for now, it is just me and my laundry. I found through this adventure that T.V. doesn’t have much interest to me, I like that a lot, and don’t know that much good comes from it anyway. It reminds me of the saying, “Absence makes the heart grow fonder”, but the opposite. I have had little time to sedate my mind with the droning of the T.V. and it has awoken me anew to the wanderings of an uncluttered mind.
It is a busy night and strangely lonely. After 8 days away from my normal life, it has begun to set in, I miss my wife and my home. But not in the way that makes me want to be there if you know what I mean. It is still raining here, maybe that is drawing me to home. I am excited about tomorrow for I will visit The Alamo. To stand on the same ground as those dauntless men, women, and children that made their last stand so many years ago. To have such conviction to an idea and be willing to sacrifice everything, including your life, for a future you may never see. Rare indeed.
 Today, I am visiting The Alamo. I am strangely excited. I know that it is not anything like it used to be, at least the surrounding landscape because it is in the heart of San Antonio surround by blacktop and large buildings. It has been swallowed by progress, albeit still whole. The church grounds and protective walls are still intact, as is the church proper. It feels like stepping through a time portal entering the church. It is a grand and dignified structure that represents a time long past. I highly recommend a visit. It is cold and raining during my visit, not like I had seen it in my mind. All the stories that surround it are filled with images and descriptions of a hot dry climate, but I persist.
It is a spiritual day. Walking the grounds here have stirred a sense of awe. Thinking of the men and women that lived and worked here so many years ago. The church makes me think of all the prayers and blessings, counsels and contrition. The sense of duty and honor that filled the hearts and minds of those that chose to make this place their last stand and turn the tides of war with the greatest of sacrifices. As I wander around, I can almost smell the gunpowder of so many shots, and feel the thunder of the cannons. It is an honor to walk the same dirt as those so dedicated to their principles to be willing to give their most precious gifts for them.
My words cannot do justice to the experience. If you are a history buff, this is a must-see.  Of course, it is altered by the passage of time, but with a little imagination, you can feel the power here, The Alamo, San Antonio, TX. The last resting place for Davy Crockett, Jim Bowie, and William Travis. Where they and a mere 200 men held a force of between 1,800 and 6,000 men at bay for 13 days, eventually being overcome by the sheer masses. The Mexican forces were ordered to take no prisoners and few were spared. The Battle of the Alamo became a symbol of heroic resistance and a rallying cry in their struggle for independence.
My next stop is Katy, TX where I will be staying in an Airbnb for the next four days as I take my final class of this adventure. It is still cold and wet here, much like I am accustomed to in Oregon. Katy is a bedroom for Houston and looks the part. It reminds me of Maricopa, AZ, a wide, flat housing complex with largely the same houses replicated over and over. The family hosting me is a very nice couple with two girls of 5 years and 6 months old. I am a little uneasy at how trusting and free they are with their home. I’m fairly certain that I would not be comfortable giving a strange man from out of state free run of my house while my wife and daughters were there, but I’m glad they are.
The next three days were spent in class at Brazos River Sportsman’s Club in Fulshear, TX. I met a fine bunch of men and the instructors were (are) top notch. I can’t tell you how much of an honor it was getting training from a group of team guys, and a green beret. The education I received could not have been better. I look forward to the next opportunity I have to train with such fine individuals and instructors of this caliber.
Subscribe to our newsletter to get the whole story delivered to your inbox!
Sunday after class, I cleaned up and headed to The Woodlands to visit some of my dearest friends, the Romanski’s, who are more like family than friends. I was with Joe when he met Tarah for the first time and have watched as their relationship blossomed, and now  they have built a family. You would be hard-pressed to meet finer people, and it has been an honor. It was as if no time had passed, I was so at ease and comfortable. It reminds me of the importance of friends and family, how fragile those relationships are, and how important it is to maintain these precious connections. We ate, laughed, and caught up on the little things. With a hug, a smile, and a box of freshly picked Texas lemons, they sent me on my way.
Third Leg
My journey home started early Monday morning around 3:30 am. I packed all my clothes and gear, took my last shower at the Airbnb, packed up the van, and was on the road by a quarter to 5. My stay here in Texas has been a good one. I got some good training and renewed my connection with the Romanski’s. It will be a long day ahead of me as I intend on getting to Santa Rosa, NM before I lay my head to rest. I say good morning to the sun as I leave Katy with a full tank of gas, a full stomach, and a full heart. The sky is on fire with orange and yellow. I truly am blessed to be on this journey and my gratitude overwhelms me as I head west out of Texas.
I plot my travels so I spend most, if not all of my westward journey on state routes and backcountry roads. I truly feel as though I am driving through the heart of this country and it has finally warmed to the temperatures I expected to find here. A pleasant 72 degrees lets me drive with the windows open and I welcome the breeze and the smells of the countryside.
 I found a cotton factory in Wingate, TX. Cotton in bales stacked like hay and enormous rolls filled the lot as loose cotton littered the sides of the road. I saw many cotton fields on my way into, and out of Wingate. Not far from there I found the largest field of windmills I have ever seen. There has to be thousands of them, almost like they are being grown here just a couple of hours SE of Lubbock, TX. I got stopped by a train here for about 20 minutes and it gave me a chance to catch up on my emails and social media. Headed NW and not far outside of Lubbock, the birthplace of one Sheldon Cooper and Texas Tech University, I ran into Shallowater, a very odoriferous town.
The land out here is largely flat and I find myself enthralled with the wide open space, broken by an occasional grove of trees and home. The sky is amazing here, it stretches from horizon to horizon and is the deepest of blues that is streaked with clouds in a most pleasing fashion. Before I knew it I was in New Mexico. The land didn’t change much at all and the day passed quickly with me often lost in thought about what has been and what is to come. The open road entices me into thought, the kind of thought that brings more  questions than answers, and it is a place that I enjoy being. Santa Rosa is my resting place for tonight and it welcomes me with the setting sun.
The transitional times of day here in the SW are quite a sight to see, something of which I shall never tire. Santa Rosa is a pleasant little city nestled up against the Eastern bank of the Pecos River. Like so many of the towns out here, water is life. Merely a rest stop for me, I grab a quick bite to eat, check into my room, and I’m early to bed. I am always excited for the new day and what it will bring. I have already seen so many amazing things on this journey and now I am headed into what is potentially some of the most beautiful natural wonders of the Southwest. But first, I must rest, tomorrow is a new day filled with promise and wonder.
Subscribe to our newsletter to get the whole story delivered to your inbox!
I don’t unpack much tonight, just enough for a comfortable sleep and a set of clean clothes. I have been living out of this van for two weeks now. I like the gypsy life but I am starting to long for the comforts of home. The warm smile of my wife, the comfort of my own bed, and the familiarity of my home and neighbors. I have spent the majority of my time alone on this trip, which is great, but I miss the social connections of home.
 Leaving Santa Rosa feels a little surreal as I climb the hill out of town headed west to Albuquerque as a song comes on the radio, it is Ol’55 by the Eagles. I stopped at the top of the hill to take a look back from whence I had come, just in time to see the sky come alive with the sunrise. It is going to be another glorious day. I stop to get breakfast and fill the tank in Edgewood, NM, just a small town a few minutes east of Albuquerque. I am trying to remember, do I take a left or right at Albuquerque? I take a right as that is my path and just north of Albuquerque I cross the Rio Grande for the last time on this adventure. I am passing through Apache land on my way to the great Navajo Nation.
The land here looks like it has been carved by water, exposing wondrous chateaus and  rock formations, yet it is hot and dry with little sign of water. I have traveled miles and miles through this part of the country and seen little to no wildlife. It is an inhospitable land that I am strangely drawn to by its immense beauty. The vast desert is broken by mountains that seem to burst from the desert like thorns on a rose bush. A great monadnock, Shiprock stands on the desert floor alone, as if lost from the other mountains or too proud to share its space with others. It is a spectacle.
Four corners finds me hungry but I take the time to appreciate where I am. I engage a couple of the natives in conversation, a Navajo and a Ute, which are the two tribes represented here. I selected some native crafts and read all the history on the separate granite blocks that represent the corners. It is strange to me that with fifty states comprising this nation there is only one place that four converge. It is run and maintained by the Navajo Nation seeing as it sits on their land. So, I guess technically, it is not in the USA. Something to ponder.
I move briefly through Colorado as I make my way northwest into Utah. I am now in what I believe is the most beautiful area, geographically speaking, of this country. There is such a wide array of shape and color in the landscape. It makes it easy to believe that it all was once under water and part of the vast western interior seaway of years ago. I have even heard tales of people still finding seashells. This waterway is responsible for the magnificent geological formations that are now exposed for all to see. I am startled as I am going up a long mountain pass out in the middle of nowhere, when all of a sudden  there is a young man on a BMX headed the opposite direction. Where did he come from? And where is he going? He reminds me of a young man I have been blessed to know, a young man who has the heart of a lion, Levi Arthur. I remember his stories of riding his bike great distances, just because he could.
Subscribe to our newsletter to get the whole story delivered to your inbox!
 I am definitely on the road less traveled out here. As I come up and out of the pass I come upon a little town called Blanding, Utah, home of The Dinosaur Museum. There is some kind of weird synergy going on now as dinosaurs are a favorite of MJ’s, Levis nephew. I am heading north now towards Canyonlands and Arches. The land is starting to come alive with a character that I have found nowhere else. There is so much to see here it is overwhelming, one could spend their whole life here and still find some new wonder to tickle their minds imagination.
The Hole ‘n the Rock, which is a monolith in the middle of a large flat plain, looks strangely like the beehive that is on all the state highway signs. It has a small hole in the base of the rock, like a beehive. Is this a natural occurrence or man-made? I won’t find out today. And now I can see the La Sal mountain range in the distance. There is snow on them, a refreshing sight.
Moab is a quiet little town used as a jumping off point for all the adventurers exploring the vast playgrounds surrounding it. But, it has its own beauty surrounded by huge red rock cliffs and sits on part of the Old Spanish National Historic Trail. I am here in time for the sunset and once again I am blessed with a spectacular display of light and shadow. It makes me wonder why anyone would choose to live in a city with all the light and sound pollution, you miss so much of what is good for your soul. We lose our connection to the natural world, its beauty and grace, the stillness of the night air, and the murmuring of its denizens.
Sunrise comes quickly as I am excited to see my family in Fillmore today. I will be two days late for my grandson Jack’s nineteenth birthday, but I made it. I have brought with me some trinkets I picked up at The Alamo for Jack, and Madi, my granddaughter. But there is a lot to see before I get there, as I am passing through Arches and The San Rafael Reef today. I cross the mighty Colorado River as I am leaving Moab. This river cut the Grand Canyon and brings life-giving water to southern California.
 Arches is a maze of worn rock hills, cliffs, and natural arches carved by the now extinct western interior seaway that eroded the softer layers and left the rest in these fabulous formations. You can see the layers in the rock that remains. Life forces its way through the cracks in the rocks in the form of junipers, sagebrush, and wildflowers. It is now an arid, desolate landscape that is forbidding to all but the hardiest.
As I hit Interstate 70 to head west, I realize that my time on the state highways and backroads has come to an end. My agenda will keep me on the interstates until I am home. It is a bittersweet realization, as I have enjoyed being on the road less traveled, but it also means that I will be home soon. As much as I have enjoyed this time on the road by myself, I miss my wife and community. I will enjoy sharing this adventure with them.
Westbound on I-70 I am astonished as I near the San Rafael Reef. It is out of this world. It fills me with a sense of awe as I gaze upon it. It truly is something from another world, it draws me into my mind and the many books I’ve read describing natural formations like this. It is truly surreal in appearance. I shall take no pictures here, this is one I will keep for me. I linger here for a while to etch it into my memories. As I near the Fishlake National Forest I am greeted by Black Dragon Canyon. A long ridge of rock borders a deep canyon that almost appears to be the back of a sleeping dragon.
 Entering the Fishlake N.F. I’m taken back to when I lived here for a short while. The hillsides covered with Juniper and Pines, and with Aspens surrounding the lake. The Paiute ATV trail is here and offers a 260 mile loop. Fishlake itself is the largest natural mountain lake in Utah. This is truly an outdoor mecca year round. One is limited only by desire, and I know someday I will return. I jump off of I-70 at Salina onto 50 for my last short stretch of state highway to Scipio and I-15. I get into Fillmore just about lunchtime to visit with family and get a bite to eat. My time here is short as I need to get to Salt Lake City tonight for a meeting in the morning.
My grandson has become a fine young man and we enjoy our visit together. He shows me what he is most passionate about now, the fire station. He is working as a volunteer firefighter and will be attending UVU in the fall to study fire sciences. You can see it in his face when he talks about it, this is his calling, it lights him up. I couldn’t be more proud of this young man.
Final Leg
I am on I-15 now and it is beginning to feel like the adventure is coming to an end. I am trying to stay in the wanderer mindset but it is becoming more and more difficult as the tribulations of life and business start to work their way back into my psyche. As I get into the urban sprawl around Utah Lake I run into freezing rain and everyone is at a near standstill, this feels like a good time to stop for the night. I am a little short of my planned destination but this is safer, a nice little place in Orem. I hope this will pass in time for my travels tomorrow.
Up with the sun once again. It is still cold out and snow is now blanketing the ground, thankfully I came prepared for this kind of weather and road conditions. The Wasatch front is socked in with haze from pollution as thick as fog. I won’t mind it when I get out of here. I stop at ReadyMan headquarters with the intent of meeting the crew and getting a chance to talk with Jeff Kirkham about the survival and preparedness community and how we can be mutually beneficial. Harry gives me a great tour of the facilities  and I get a photo op with Josh “Bearcat” Tyler, but unfortunately miss Jeff, it will have to wait for the next opportunity.

So I point the van northwest and make for home. It is a strange transformation as I slowly let go of my wanderlust and allow it to be replaced with a sense of urgency to be home. I am passing through a part of the world that I have seen hundreds of times, so that might lend to the loss of interest. The landscape of southern Idaho is really not that spectacular anyway. Idaho’s grandeur is in the mountains north of here.
I was planning to see friends in La Pine on my way back home, but a weather front moving in has redirected me to a safer path down the glorious Columbia River Gorge. I cross the Snake River at the Oregon-Idaho border and stop in Baker City for the night. I am only five and half hours from home but I am tired and now reluctant to be finished. I know that once I arrive at home the feeling of peace I have found on the road will be slowly eroded by the vicissitudes of life and replaced with a longing to return to the road and the unknown.
 I am not in a hurry this morning but rising with the sun and moving out has become a sort of ritual these last few days. I love the La Grande valley surrounded by mountains. The Eagle Cap wilderness to the east, the Blue Mountains to the north, and the Little Alps to the south. This area of Oregon is a paradise for the outdoor adventurer. There are hundreds of miles of wilderness that is filled with rivers and lakes teeming with trout, mostly browns but also the occasional Dolly Varden or Cut-throat. A person with a pole and some patience will never go hungry here. The hills are also filled with deer, elk, antelope, and Bighorn sheep.
 As I come to the top of Cabbage hill I can see out onto the Umatilla Indian Reservation, it is blanketed clouds right now like it is filled with fluffy cotton. I drop down through the clouds into the valley that Pendleton is set in. This was once my home and still has plenty of family here, but today I am only passing through. Just after I pass the Umatilla Army Depot and Boardman, I climb down into the Columbia River Gorge. This is when I can really start feeling the pull of home. It is an average day in the gorge, the water is still. but it is cloudy and rainy.
I am starting to be reminiscent of my journey and wishing it wasn’t over. It has been a fantastic voyage driving there and back again, from home to Houston. I have seen many wonderful things and experienced a slew of emotions. It is difficult to fully impart the experience through words. I hope I have left you with a longing to travel and see this great land I live in. I have rekindled a lust I felt as a young man but was unable to realize. It is never too late to live the life you dream of, it is there for the taking.

As Always,
Stay Vigilant and Be Prepared


You must be logged in to post a comment.